0%
Operation Management
1 Deploy cluster
1.1 Single Master mode
This mode is risky, upon broker restart or broken down, the whole service is unavailable. It's not recommended in production environment, it can be used for local test.
1)Start NameServer
### Start Name Server
$ nohup sh mqnamesrv &

### check whether Name Server is successfully started
$ tail -f ~/logs/rocketmqlogs/namesrv.log
The Name Server boot success...
2)Start Broker
### start Broker
$ nohup sh bin/mqbroker -n localhost:9876 &
check whether Name Server is successfully started, eg: Broker’s IP is 192.168.1.2, Broker’s name is broker-a
$ tail -f ~/logs/rocketmqlogs/Broker.log
The broker[broker-a, 192.169.1.2:10911] boot success…
1.2 Multi Master mode
Cluster contains Master node only, no Slave node, eg: 2 Master nodes, 3 Master nodes, advantages and disadvantages of this mode are shown below:
advantages:simple configuration, single Master node broke down or restart do not impact application. Under RAID10 disk config, even if machine broken down and cannot recover, message do not get lost because of RAID10's high reliable(async flush to disk lost little message, sync to disk do not lost message), this mode get highest performance.
disadvantages:during the machine's down time, messages have not be consumed on this machine can not be subscribed before recovery. That will impacts message's instantaneity.
1)Start NameServer
NameServer should be started before broker. If under production environment, we recommend start 3 NameServer nodes for high available. Startup command is equal, as shown below:
### start Name Server
$ nohup sh mqnamesrv &

### check whether Name Server is successfully started
$ tail -f ~/logs/rocketmqlogs/namesrv.log
The Name Server boot success...
2)start Broker cluster
### start the first Master on machine A, eg:NameServer's IP is :192.168.1.1
$ nohup sh mqbroker -n 192.168.1.1:9876 -c $ROCKETMQ_HOME/conf/2m-noslave/broker-a.properties &

### start the second Master on machine B, eg:NameServer's IP is :192.168.1.1
$ nohup sh mqbroker -n 192.168.1.1:9876 -c $ROCKETMQ_HOME/conf/2m-noslave/broker-b.properties &

…
The above commands only used for single NameServer. In multi NameServer cluster, multi addresses concat by semicolon followed by -n in broker start command.
1.3 Multi Master Multi Slave mode - async replication
Each Master node is equipped with one Slave node, this mode has many Master-Slave group, using async replication for HA, slaver has a lag(ms level) behind master, advantages and disadvantages of this mode are shown below:
advantages: message lost a little, even if disk is broken; message instantaneity do not loss; Consumer can still consume from slave when master is down, this process is transparency to user, no human intervention is required; Performance is almost equal to Multi Master mode.
disadvantages: message lost a little data, when Master is down and disk broken.
1)Start NameServer
### start Name Server
$ nohup sh mqnamesrv &

### check whether Name Server is successfully started
$ tail -f ~/logs/rocketmqlogs/namesrv.log
The Name Server boot success...
2)Start Broker cluster
### start first Master on machine A, eg: NameServer's IP is 192.168.1.1
$ nohup sh mqbroker -n 192.168.1.1:9876 -c $ROCKETMQ_HOME/conf/2m-2s-async/broker-a.properties &

### start second Master on machine B, eg: NameServer's IP is 192.168.1.1
$ nohup sh mqbroker -n 192.168.1.1:9876 -c $ROCKETMQ_HOME/conf/2m-2s-async/broker-b.properties &

### start first Slave on machine C, eg: NameServer's IP is 192.168.1.1
$ nohup sh mqbroker -n 192.168.1.1:9876 -c $ROCKETMQ_HOME/conf/2m-2s-async/broker-a-s.properties &

### start second Slave on machine D, eg: NameServer's IP is 192.168.1.1
$ nohup sh mqbroker -n 192.168.1.1:9876 -c $ROCKETMQ_HOME/conf/2m-2s-async/broker-b-s.properties &
1.4 Multi Master Multi Slave mode - synchronous double write
Each Master node is equipped with one Slave node, this mode has many Master-Slave group, using synchronous double write for HA, application's write operation is successful means both master and slave write successful, advantages and disadvantages of this mode are shown below:
advantages:both data and service have no single point failure, message has no lantancy even if Master is down, service available and data available is very high;
disadvantages:this mode's performance is 10% lower than async replication mode, sending latency is a little high, in the current version, it do not have auto Master-Slave switch when Master is down.
1)Start NameServer
### start Name Server
$ nohup sh mqnamesrv &

### check whether Name Server is successfully started
$ tail -f ~/logs/rocketmqlogs/namesrv.log
The Name Server boot success...
2)Start Broker cluster
### start first Master on machine A, eg:NameServer's IP is 192.168.1.1
$ nohup sh mqbroker -n 192.168.1.1:9876 -c $ROCKETMQ_HOME/conf/2m-2s-sync/broker-a.properties &

### start second Master on machine B, eg:NameServer's IP is 192.168.1.1
$ nohup sh mqbroker -n 192.168.1.1:9876 -c $ROCKETMQ_HOME/conf/2m-2s-sync/broker-b.properties &

### start first Slave on machine C, eg: NameServer's IP is 192.168.1.1
$ nohup sh mqbroker -n 192.168.1.1:9876 -c $ROCKETMQ_HOME/conf/2m-2s-sync/broker-a-s.properties &

### start second Slave on machine D, eg: NameServer's IP is 192.168.1.1
$ nohup sh mqbroker -n 192.168.1.1:9876 -c $ROCKETMQ_HOME/conf/2m-2s-sync/broker-b-s.properties &
The above Broker matches Slave by specifying the same BrokerName, Master's BrokerId must be 0, Slave's BrokerId must larger than 0. Besides, a Master can have multi Slaves that each has a distinct BrokerId. $ROCKETMQ_HOME indicates RocketMQ's install directory, user needs to set this environment parameter.
2 mqadmin management tool
Attentions:
- execute command:
./mqadmin {command} {args}- almost all commands need -n indicates NameSerer address, format is ip:port
- almost all commands can get help info by -h
- if command contains both Broker address(-b) and cluster name(-c), it's prior to use broker address. If command do not contains broker address, it will executed on all hosts in this cluster. Support only one broker host. -b format is ip:port, default port is 10911
- there are many commands under tools, but not all command can be used, only commands that initialized in MQAdminStartup can be used, you can modify this class, add or self-define command.
- because of version update, little command do not update timely, please refer to source code directly when occur error.
2.1 Topic
| name | meaning | command items | explaination |
| updateTopic | create or update Topic's config | -b | Broker address, means which Broker that topic is located, only support single Broker, address format is ip:port |
| -c | cluster name, whic cluster that topic belongs to(query cluster info by clusterList) | ||
| -h- | print help info | ||
| -n | NameServer Service address, format is ip:port | ||
| -p | assign read write authority to new topic(W=2|R=4|WR=6) | ||
| -r | the count of queue that can be read(default is 8) | ||
| -w | the count of queue that can be wrote(default is 8) | ||
| -t | topic name(can only use characters ^[a-zA-Z0-9_-]+$ ) | ||
| deleteTopic | delete Topic | -c | cluster name, which cluster that topic will be deleted belongs to(query cluster info by clusterList) |
| -h | print help info | ||
| -n | NameServer Service address, format is ip:port | ||
| -t | topic name(can only use characters ^[a-zA-Z0-9_-]+$ ) | ||
| topicList | query Topic list info | -h | print help info |
| -c | return topic list only if do not contains -c, if containis -c, it will return cluster name, topic name, consumer group name | ||
| -n | NameServer Service address, format is ip:port | ||
| topicRoute | query Topic's route info | -t | topic name |
| -h | print help info | ||
| -n | NameServer Service address, format is ip:port | ||
| topicStatus | query Topic's offset | -t | topic name |
| -h | print help info | ||
| -n | NameServer Service address, format is ip:port | ||
| topicClusterList | query cluster list where Topic belongs to | -t | topic name |
| -h | print help info | ||
| -n | NameServer Service address, format is ip:port | ||
| updateTopicPerm | update Topic's produce and consume authority | -t | topic name |
| -h | print help info | ||
| -n | NameServer Service address, format is ip:port | ||
| -b | Broker address which topic belongs to, support single broker only, format is ip:port | ||
| -p | assign read and write authority to the new topic(W=2|R=4|WR=6) | ||
| -c | cluster name, which topic belongs to(query cluster info by clusterList), if do not have -b, execute comman an all brokers. | ||
| updateOrderConf | create delete get specified namespace's kv config from NameServer, have not enabled at present | -h | print help info |
| -n | NameServer Service address, format is ip:port | ||
| -t | topic, key | ||
| -v | orderConf, value | ||
| -m | method, including get, put, delete | ||
| allocateMQ | calculate consumer list rebalance result by average rebalance algorithm | -t | topic name |
| -h | print help info | ||
| -n | NameServer Service address, format is ip:port | ||
| -i | ipList, seperate by comma, calculate which topic queue that ips will load. | ||
| statsAll | print Topic's subscribe info, TPS, size of message blocked, count of read and write at last 24h, eg. | -h | print help info |
| -n | NameServer Service address, format is ip:port | ||
| -a | only print active topic or not | ||
| -t | assign topic |
2.2 Cluster
| 名称 | meaning | command items | explaination |
| clusterList | query cluster info, including cluster, BrokerName, BrokerId, TPS, eg. | -m | print more infos(eg: #InTotalYest, #OutTotalYest, #InTotalToday ,#OutTotalToday) |
| -h | print help info | ||
| -n | NameServer Service address, format is ip:port | ||
| -i | print interval, unit second | ||
| clusterRT | send message to detect each cluster's Broker RT. Message will be sent to ${BrokerName} Topic。 | -a | amount, count of detection, RT = sum time / amount |
| -s | size of message, unit B | ||
| -c | which cluster will be detected | ||
| -p | whether print format log, splitted by |, default is not print | ||
| -h | print help info | ||
| -m | which machine room it belongs to, just for print | ||
| -i | send interval, unit second | ||
| -n | NameServer Service address, format is ip:port |
2.3 Broker
| 名称 | meaning | command items | explaination |
| updateBrokerConfig | update Broker's config file, it will modify Broker.conf | -b | Broker address, format is ip:port |
| -c | cluster name | ||
| -k | key | ||
| -v | value | ||
| -h | print help info | ||
| -n | NameServer Service address, format is ip:port | ||
| brokerStatus | get Broker's statistics info, running status(including whatever you want). | -b | Broker address, fomat isip:port |
| -h | print help info | ||
| -n | NameServer Service address, format is ip:port | ||
| brokerConsumeStats | Broker's consumer info, including Consume Offset, Broker Offset, Diff, Timestamp that ordered by essage Queue | -b | Broker address, fomat isip:port |
| -t | request timeout time | ||
| -l | diff threshold, it will print when exceed this threshold. | ||
| -o | whether is sequencial topic, generally false | ||
| -h | print help info | ||
| -n | NameServer Service address, format is ip:port | ||
| getBrokerConfig | get Broker's config | -b | Broker address, fomat isip:port |
| -n | NameServer Service address, format is ip:port | ||
| wipeWritePerm | revoke broker's write authority from NameServer. | -b | Broker address, fomat isip:port |
| -n | NameServer Service address, format is ip:port | ||
| -h | print help info | ||
| cleanExpiredCQ | clean Broker's expired Consume Queue that maybe generated by decrease queue count. | -n | NameServer Service address, format is ip:port |
| -h | print help info | ||
| -b | Broker address, fomat isip:port | ||
| -c | cluster name | ||
| cleanUnusedTopic | clean Broker's unused Topic that deleted mannually to release memory that Topic's Consume Queue occupied. | -n | NameServer Service address, format is ip:port |
| -h | print help info | ||
| -b | Broker address, fomat isip:port | ||
| -c | cluster name | ||
| sendMsgStatus | send message to Broker, return send status and RT | -n | NameServer Service address, format is ip:port |
| -h | print help info | ||
| -b | BrokerName, is different from broker address | ||
| -s | message size, unit B | ||
| -c | send count |
2.4 Message
| 名称 | meaning | command items | explaination |
| queryMsgById | query message by offsetMsgId. If use opensource console, it should use offsetMsgId. Please refer to QueryMsgByIdSubCommand for detail. | -i | msgId |
| -h | print help info | ||
| -n | NameServer Service address, format is ip:port | ||
| queryMsgByKey | query message by Message's Key | -k | msgKey |
| -t | topic name | ||
| -h | print help info | ||
| -n | NameServer Service address, format is ip:port | ||
| queryMsgByOffset | query message by Offset | -b | Broker name(it's not broker address, can query Broker name by clusterList). |
| -i | query queue id | ||
| -o | offset value | ||
| -t | topic name | ||
| -h | print help info | ||
| -n | NameServer Service address, format is ip:port | ||
| queryMsgByUniqueKey | query by msgId, msgId is different from offsetMsgId, please refer to Frequently asked questions about operations for details. Use -g and -d to let specified consumer return consume result. | -h | print help info |
| -n | NameServer Service address, format is ip:port | ||
| -i | uniqe msg id | ||
| -g | consumerGroup | ||
| -d | clientId | ||
| -t | topic name | ||
| checkMsgSendRT | detect RT of sending a message to a topic, similiar to clusterRT | -h | print help info |
| -n | NameServer Service address, format is ip:port | ||
| -t | topic name | ||
| -a | detection count | ||
| -s | size of the message | ||
| sendMessage | send a message, also can send to a specified Message Queue. | -h | print help info |
| -n | NameServer Service address, format is ip:port | ||
| -t | topic name | ||
| -p | body, message entity | ||
| -k | keys | ||
| -c | tags | ||
| -b | BrokerName | ||
| -i | queueId | ||
| consumeMessage | consume message. Differert consume logic depends on offset, start & end timestamp, message queue, please refer to ConsumeMessageCommand for details. | -h | print help info |
| -n | NameServer Service address, format is ip:port | ||
| -t | topic name | ||
| -b | BrokerName | ||
| -o | offset that consumer start consume | ||
| -i | queueId | ||
| -g | consumer gropu | ||
| -s | timestamp at start, refer to -h to get format开 | ||
| -d | timestamp at the end | ||
| -c | size of message that consumed | ||
| printMsg | consume and print messages from broker, support a time range | -h | print help info |
| -n | NameServer Service address, format is ip:port | ||
| -t | topic name | ||
| -c | charset, eg: UTF-8 | ||
| -s | subExpress, filter expression | ||
| -b | timestap at start, refer to -h to get format | ||
| -e | timestamp at the end | ||
| -d | whether print message entity or not | ||
| printMsgByQueue | similar to printMsg, but it need specified Message Queue | -h | print help info |
| -n | NameServer Service address, format is ip:port | ||
| -t | topic name | ||
| -i | queueId | ||
| -a | BrokerName | ||
| -c | charset, eg: UTF-8 | ||
| -s | subExpress, filter expression | ||
| -b | timestamp at start, refer to -h to get format | ||
| -e | timestamp at the end | ||
| -p | whether print message or not | ||
| -d | whether print message entity or not | ||
| -f | whether count and print tag or not | ||
| resetOffsetByTime | reset offset by timestamp, Broker and consumer will all be reseted | -h | print help info |
| -n | NameServer Service address, format is ip:port | ||
| -g | consumer group | ||
| -t | topic name | ||
| -s | reset offset corresponding to this timestamp | ||
| -f | whether enforce to reset or not, if set false, only can reset offset, if set true, it omit the relationship between timestamp and consumer offset. | ||
| -c | whether reset c++ sdk's offset or not |
2.5 Consumer, Consumer Group
| name | meaning | command items | explaination |
| consumerProgress | query subscribe status, can get blocking counts of a concrete client ip. | -g | consumer group name |
| -s | whether print client IP or not | ||
| -h | print help info | ||
| -n | NameServer Service address, format is ip:port | ||
| consumerStatus | query consumer status, including message blocking, and consumer's jstack result(please refer to ConsumerStatusSubCommand) | -h | print help info |
| -n | NameServer Service address, format is ip:port | ||
| -g | consumer group | ||
| -i | clientId | ||
| -s | whether execute jstack or not | ||
| updateSubGroup | create or update subscribe info | -n | NameServer Service address, format is ip:port |
| -h | print help info | ||
| -b | Broker address | ||
| -c | cluster name | ||
| -g | consumer group name | ||
| -s | consumer group is allowed to consume or not | ||
| -m | start consume from minimal offset or not | ||
| -d | broadcast mode or not | ||
| -q | capacity of retry queue | ||
| -r | max retry count | ||
| -i | It works when slaveReadEnable enabled, and that not consumed from slave. Suggesting that consume from slave node by specify slave id. | ||
| -w | If broker consume from slave, whic slave node depends on this config that configed by BrokerId, eg: 1. | ||
| -a | whether notify other consumers to rebalance or not when the count of consumer changes | ||
| deleteSubGroup | delete subscribe info from Broker | -n | NameServer Service address, format is ip:port |
| -h | print help info | ||
| -b | Broker address | ||
| -c | cluster name | ||
| -g | consumer group name | ||
| cloneGroupOffset | use source group's offset at target group | -n | NameServer Service address, format is ip:port |
| -h | print help info | ||
| -s | source consumer group | ||
| -d | target consumer group | ||
| -t | topic name | ||
| -o | not used at present |
2.6 Connection
| name | meaning | command items | explaination |
| consumerConnec tion | query Consumer's connection | -g | consumer group name |
| -n | NameServer Service address, format is ip:port | ||
| -h | print help info | ||
| producerConnec tion | query Producer's connection | -g | producer group name |
| -t | topic name | ||
| -n | NameServer Service address, format is ip:port | ||
| -h | print help info |
2.7 NameServer
| name | meaning | command items | explaination |
| updateKvConfig | update NameServer's kv config, not used at present | -s | namespace |
| -k | key | ||
| -v | value | ||
| -n | NameServer Service address, format is ip:port | ||
| -h | print help info | ||
| deleteKvConfig | delete NameServer's kv config | -s | namespace |
| -k | key | ||
| -n | NameServer Service address, format is ip:port | ||
| -h | print help info | ||
| getNamesrvConfig | get NameServer's config | -n | NameServer Service address, format is ip:port |
| -h | print help info | ||
| updateNamesrvConfig | modify NameServer's config | -n | NameServer Service address, format is ip:port |
| -h | print help info | ||
| -k | key | ||
| -v | value |
2.8 Other
| name | meaning | command items | explaination |
| startMonitoring | Start the monitoring process, monitor message deletion and the number of retried messages in the queue | -n | NameServer Service address, format is ip:port |
| -h | print help info |
3 Frequently asked questions about operations
3.1 RocketMQ's mqadmin command error
question description:execute mqadmin occur below exception after deploy RocketMQ cluster.
org.apache.rocketmq.remoting.exception.RemotingConnectException: connect tofailed
Solution: execute command export NAMESRV_ADDR=ip:9876 (ip is NameServer's ip address), then execute mqadmin commands.
3.2 RocketMQ consumer cannot consume, because of different version of producer and consumer.
question description: one producer produce message, consumer A can consume, consume B cannot consume, RocketMQ console print:
Not found the consumer group consume stats, because return offset table is empty, maybe the consumer not consume any message。
Solution: make sure that producer and consumer has the same version of rocketmq-client.
3.3 Consumer cannot consume oldest message, when a new consumer group is added.
question description: when a new consumer group start, it consumes from current offset, do not fetch oldest message.
Solution: rocketmq's default policy is consume from latest, that is skip oldest message. If you want consume oldest message, you need to set org.apache.rocketmq.client.consumer.DefaultMQPushConsumer#setConsumeFromWhere. The following is three common configurations:
- default configuration, a new consumer group consume from latest position at first startup, then consume from last time's offset at next startup, that is skip oldest message;
consumer.setConsumeFromWhere(ConsumeFromWhere.CONSUME_FROM_LAST_OFFSET);
- a new consumer group consume from oldest postion at first startup, then consume from last time's offset at next startup, that is consume the unexpired message;
consumer.setConsumeFromWhere(ConsumeFromWhere.CONSUME_FROM_FIRST_OFFSET);
- a new consumer group consume from specified timestamp at first startup, then consume from last time's offset at next startup, cooperate with consumer.setConsumeTimestamp(), default is half an hour before;
consumer.setConsumeFromWhere(ConsumeFromWhere.CONSUME_FROM_TIMESTAMP);
3.4 How to enable consume from Slave
In some cases, consumer need reset offset to a day or two before, if Master Broker has limited memory, it's CommitLog will have a high IO load, then it will impact other message's read and write that on this broker. When slaveReadEnable=true is set, and consumer's offset exceeds accessMessageInMemoryMaxRatio=40%, Master Broker will recommend consumer consume from Slave Broker to lower Master Broker IO.
3.5 Performance tuning
A spin lock is recommended for asynchronous disk flush, a reentrant lock is recommended for synchronous disk flush, configuration item is useReentrantLockWhenPutMessage, default is false; Enable TransientStorePoolEnable is recommended when use asynchronous disk flush; Recommend to close transferMsgByHeap to improve fetch efficiency; Set a little larger sendMessageThreadPoolNums, when use synchronous disk flush.
3.6 The meaning and difference between msgId and offsetMsgId in RocketMQ
You will usually see the following log print message after sending message by using RocketMQ sdk.
SendResult [sendStatus=SEND_OK, msgId=0A42333A0DC818B4AAC246C290FD0000, offsetMsgId=0A42333A00002A9F000000000134F1F5, messageQueue=MessageQueue [topic=topicTest1, BrokerName=mac.local, queueId=3], queueOffset=4]
- msgId, is generated by producer sdk. In particular, call method
MessageClientIDSetter.createUniqIDBuffer()to generate unique Id; - offsetMsgId, offsetMsgId is generated by Broker server(format is "Ip Address + port + CommitLog offset"). offsetMsgId is messageId that is RocketMQ console's input.
Dledger Quick Deployment
preface
This document is mainly introduced for how to build and deploy auto failover RocketMQ cluster based on DLedger.
For detailed new cluster deployment and old cluster upgrade document, please refer to Deployment Guide。
1. Build from source code
Build phase contains two parts, first, build DLedger, then build RocketMQ.
1.1 Build DLedger
git clone https://github.com/openmessaging/openmessaging-storage-dledger.git
cd openmessaging-storage-dledger
mvn clean install -DskipTests
1.2 Build RocketMQ
git clone https://github.com/apache/rocketmq.git
cd rocketmq
git checkout -b store_with_dledger origin/store_with_dledger
mvn -Prelease-all -DskipTests clean install -U
2. Quick Deployment
after build successful
cd distribution/target/apache-rocketmq
sh bin/dledger/fast-try.sh start
if the above commands executed successfully, then check cluster status by using mqadmin operation commands.
sh bin/mqadmin clusterList -n 127.0.0.1:9876
If everything goes well, the following content will appear:

(BID is 0 indicate Master,the others are Follower)
After startup successful, producer can produce message, and then test failover scenario.
Stop cluster fastly, execute the following command:
sh bin/dledger/fast-try.sh stop
Quick deployment, default configuration is in directory conf/dledger,default storage path is /tmp/rmqstore.
3. Failover
After successful deployment, kill Leader process(as the above example, kill process that binds port 30931), about 10 seconds elapses, use clusterList command check cluster's status, Leader switch to another node.
Dledger cluster deployment
preface
This document introduces how to deploy auto failover RocketMQ-on-DLedger Group。
RocketMQ-on-DLedger Group is a broker group with same name, needs at least 3 nodes, elect a Leader by Raft algorithm automatically, the others as Follower, replicating data between Leader and Follower for system high available.
RocketMQ-on-DLedger Group can failover automatically, and maintains consistent.
RocketMQ-on-DLedger Group can scale up horizontal, that is, can deploy any RocketMQ-on-DLedger Groups providing services external.
1. New cluster deployment
1.1 Write the configuration
each RocketMQ-on-DLedger Group needs at least 3 machines.(assuming 3 in this document)
write 3 configuration files, advising refer to the directory of conf/dledger ‘s example configuration file.
key configuration items:
| name | meaning | example |
|---|---|---|
| enableDLegerCommitLog | whether enable DLedger | true |
| dLegerGroup | DLedger Raft Group's name, advising maintain consistent to brokerName | RaftNode00 |
| dLegerPeers | DLedger Group's nodes port infos, each node's configuration stay consistent in the same group. | n0-127.0.0.1:40911;n1-127.0.0.1:40912;n2-127.0.0.1:40913 |
| dLegerSelfId | node id, must belongs to dLegerPeers; each node is unique in the same group. | n0 |
| sendMessageThreadPoolNums | the count of sending thread, advising set equal to the cpu cores. | 16 |
the following presents an example configuration conf/dledger/broker-n0.conf.
brokerClusterName = RaftCluster
brokerName=RaftNode00
listenPort=30911
namesrvAddr=127.0.0.1:9876
storePathRootDir=/tmp/rmqstore/node00
storePathCommitLog=/tmp/rmqstore/node00/commitlog
enableDLegerCommitLog=true
dLegerGroup=RaftNode00
dLegerPeers=n0-127.0.0.1:40911;n1-127.0.0.1:40912;n2-127.0.0.1:40913
## must be unique
dLegerSelfId=n0
sendMessageThreadPoolNums=16
1.2 Start Broker
Startup stays consistent with the old version.
nohup sh bin/mqbroker -c conf/dledger/xxx-n0.conf &
nohup sh bin/mqbroker -c conf/dledger/xxx-n1.conf &
nohup sh bin/mqbroker -c conf/dledger/xxx-n2.conf &
2. Upgrade old cluster
If old cluster deployed in Master mode, then each Master needs to be transformed into a RocketMQ-on-DLedger Group.
If old cluster deployed in Master-Slave mode, then each Master-Slave group needs to be transformed into a RocketMQ-on-DLedger Group.
2.1 Kill old Broker
execute kill command, or call bin/mqshutdown broker.
2.2 Check old Commitlog
Each node in RocketMQ-on-DLedger group is compatible with old Commitlog, but Raft replicating process works on the adding message only. So, to avoid occurring exceptions, old Commitlog must be consistent.
If old cluster deployed in Master-Slave mode, it maybe inconsistent after shutdown. Advising use md5sum to check at least 2 recently Commitlog file, if occur inconsistent, maintain consistent by copy.
Although RocketMQ-on-DLedger Group can deployed with 2 nodes, it lacks failover ability(at least 3 nodes can tolerate one node fail).
Make sure that both Master and Slave’s Commitlog is consistent, then prepare 3 machines, copy old Commitlog from Master to this 3 machines(BTW, copy the config directory).
Then, go ahead to set configurations.
2.3 Modify configuration
Refer to New cluster deployment.
2.4 Restart Broker
Refer to New cluster deployment.
design
Design
1 Message Store

1.1 The Architecure of Message Store
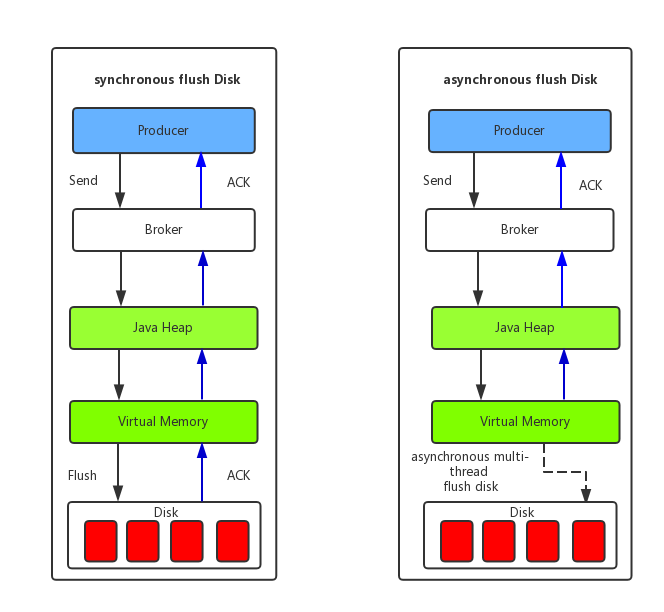
1.2 PageCache and Memory-Map(Mmap)
1.3 Message Flush
2 Communication Mechanism
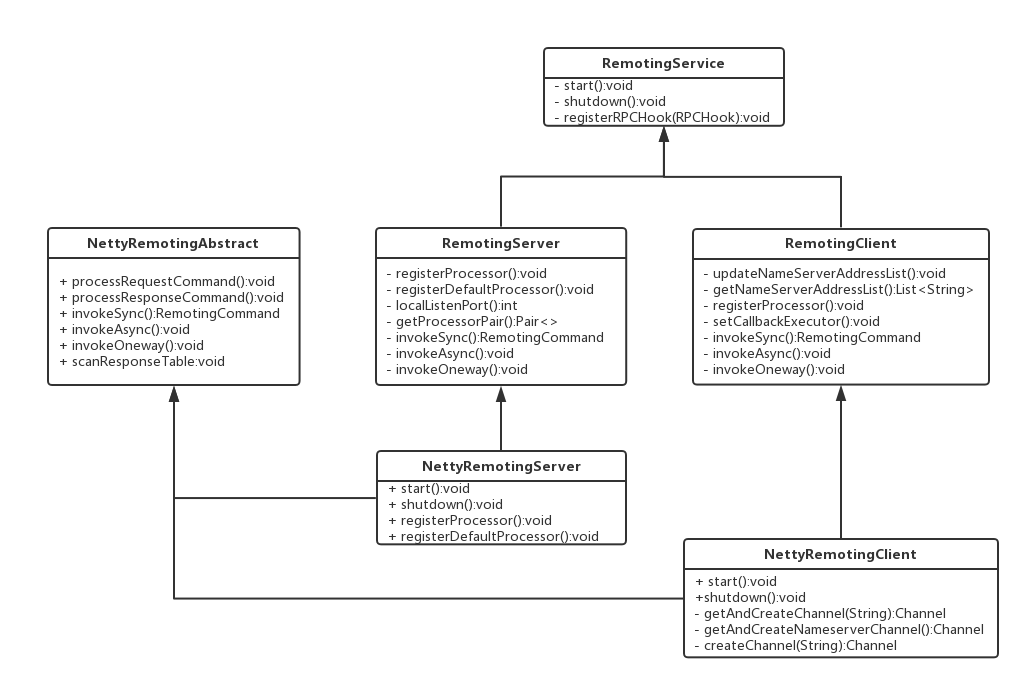
2.1 The class diagram of Remoting module
2.2 The design of protocol and encode/decode

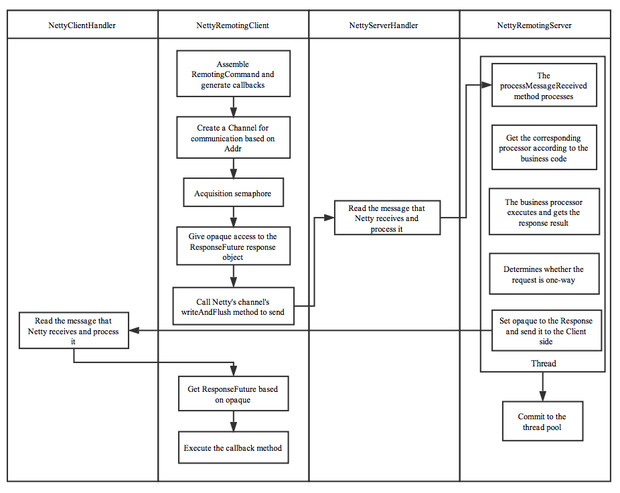
2.3 The three ways and process of message communication
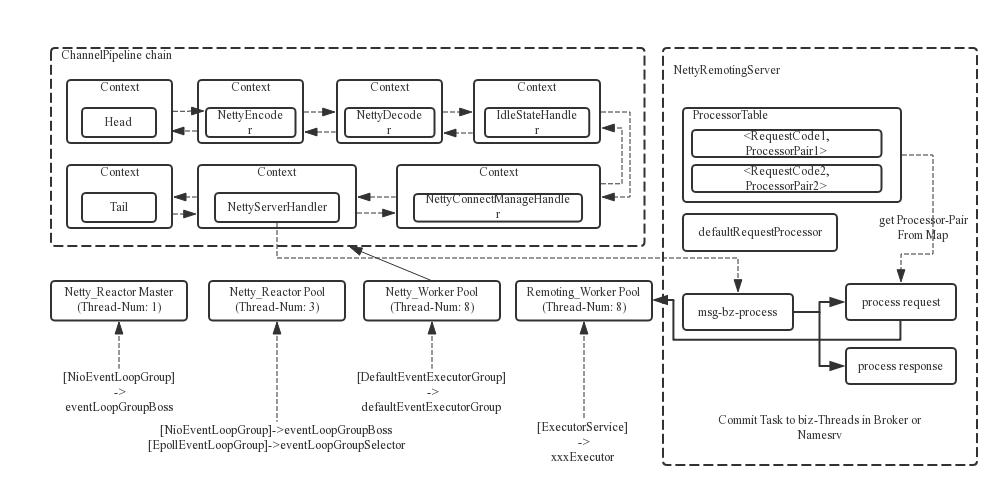
2.4 The multi-thread design of Reactor
3 Message Filter

4 LoadBalancing
4.1 The loadBalance of Producer
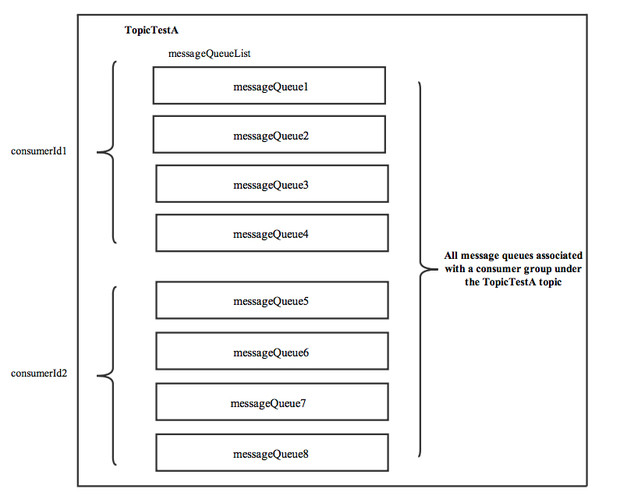
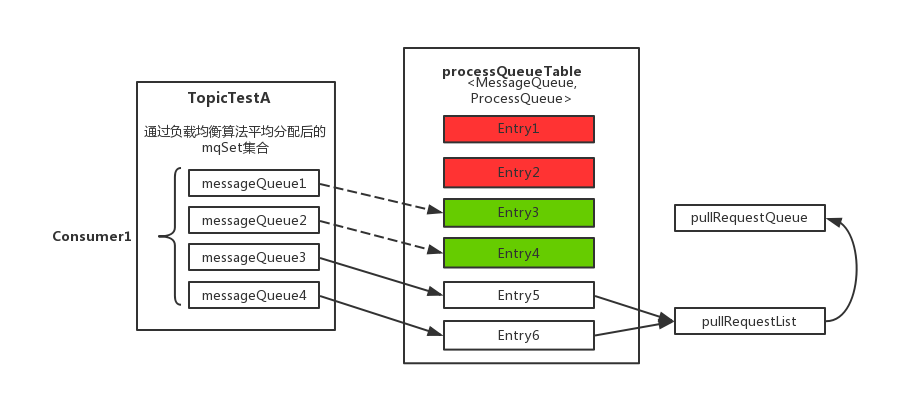
4.2 The loadBalance of Consumer
5 Transactional Message
Apache RocketMQ supports distributed transactional message from version 4.3.0. RocketMQ implements transactional message by using the protocol of 2PC(two-phase commit), in addition adding a compensation logic to handle timeout-case or failure-case of commit-phase, as shown below.
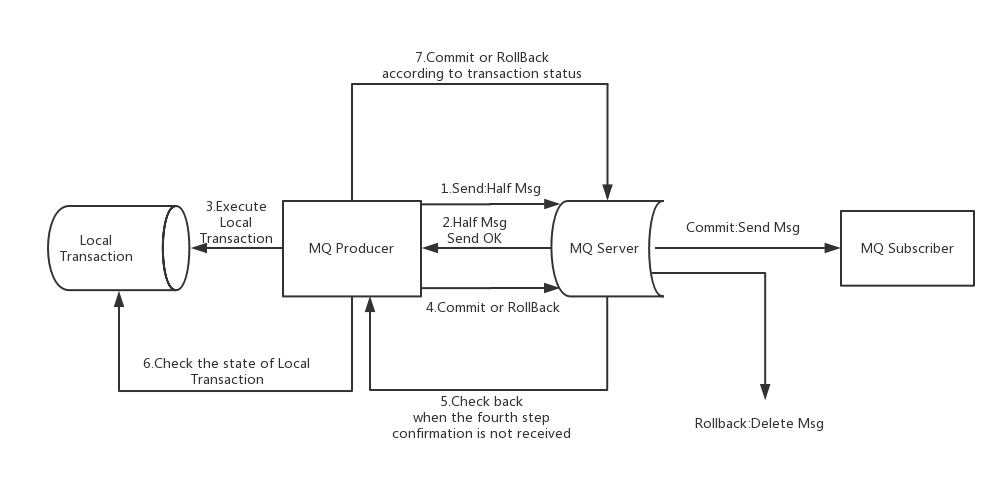
5.1 The Process of RocketMQ Transactional Message
The picture above shows the overall architecture of transactional message, including the sending of message(commit-request phase), the sending of commit/rollback(commit phase) and the compensation process.
The sending of message and Commit/Rollback.
(1) Sending the message(named Half message in RocketMQ)
(2) The server responds the writing result(success or failure) of Half message.
(3) Handle local transaction according to the result(local transaction won’t be executed when the result is failure).
(4) Sending Commit/Rollback to broker according to the result of local transaction(Commit will generate message index and make the message visible to consumers).
Compensation process
(1) For a transactional message without a Commit/Rollback (means the message in the pending status), a “back-check” request is initiated from the broker.
(2) The Producer receives the “back-check” request and checks the status of the local transaction corresponding to the “back-check” message.
(3) Redo Commit or Rollback based on local transaction status.
The compensation phase is used to resolve the timeout or failure case of the message Commit or Rollback.
5.2 The design of RocketMQ Transactional Message
- Transactional message is invisible to users in first phase(commit-request phase)
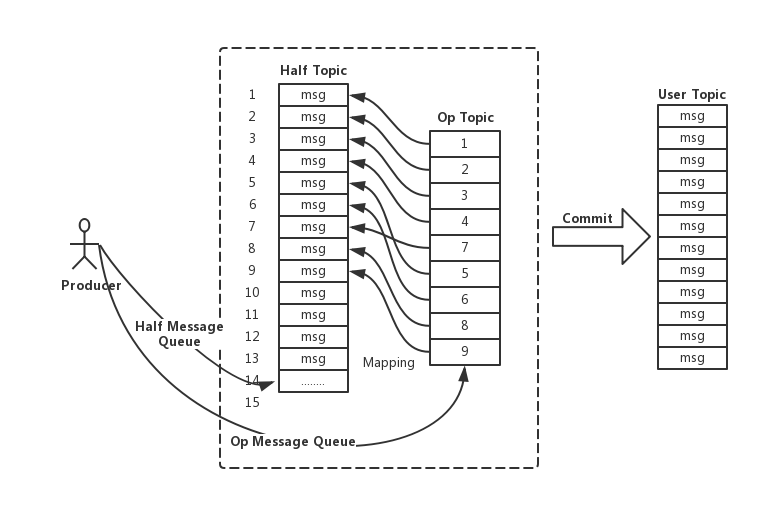
Upon on the main process of transactional message, the message of first phase is invisible to the user. This is also the biggest difference from normal message. So how do we write the message while making it invisible to the user? And below is the solution of RocketMQ: if the message is a Half message, the topic and queueId of the original message will be backed up, and then changes the topic to RMQ_SYS_TRANS_HALF_TOPIC. Since the consumer group does not subscribe to the topic, the consumer cannot consume the Half message. Then RocketMQ starts a timing task, pulls the message for RMQ_SYS_TRANS_HALF_TOPIC, obtains a channel according to producer group and sends a back-check to query local transaction status, and decide whether to submit or roll back the message according to the status.
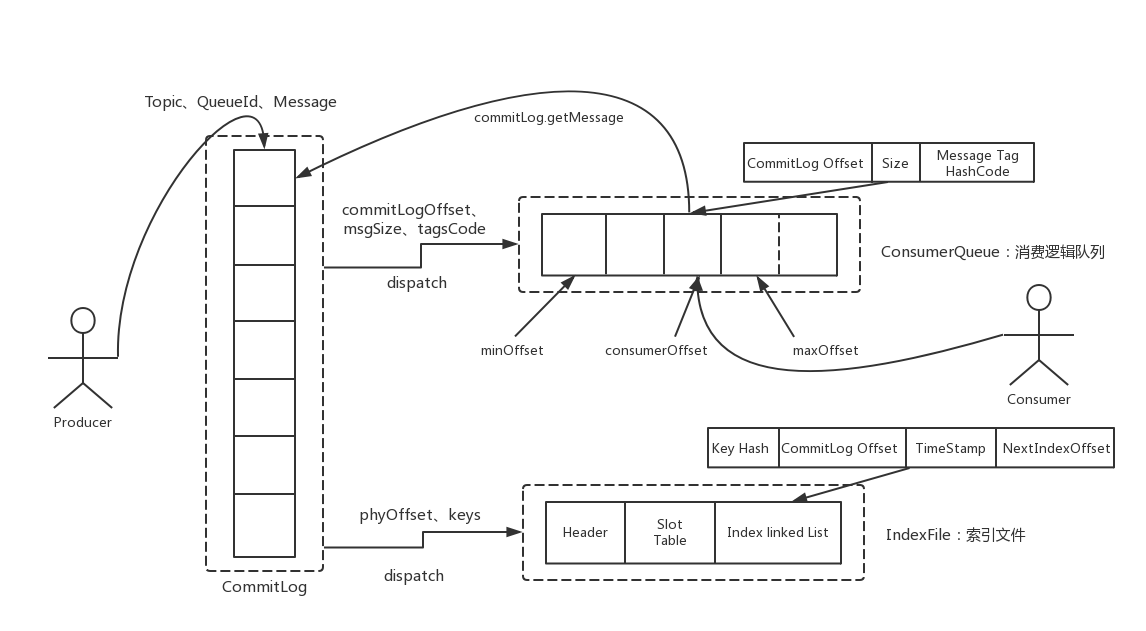
In RocketMQ, the storage structure of the message in the broker is as follows. Each message has corresponding index information. The Consumer reads the content of the message through the secondary index of the ConsumeQueue. The flow is as follows:
The specific implementation strategy of RocketMQ is: if the transactional message is written, topic and queueId of the message are replaced, and the original topic and queueId are stored in the properties of the message. Because the replace of the topic, the message will not be forwarded to the Consumer Queue of the original topic, and the consumer cannot perceive the existence of the message and will not consume it. In fact, changing the topic is the conventional method of RocketMQ(just recall the implementation mechanism of the delay message).
- Commit/Rollback operation and introduction of Op message
After finishing writing a message that is invisible to the user in the first phase, here comes two cases in the second phase. One is Commit operation, after which the message needs to be visible to the user; the other one is Rollback operation, after which the first phase message(Half message) needs to be revoked. For the case of Rollback, since first-phase message itself is invisible to the user, there is no need to actually revoke the message (in fact, RocketMQ can't actually delete a message because it is a sequential-write file). But still some operation needs to be done to identity the final status of the message, to differ it from pending status message. To do this, the concept of "Op message" is introduced, which means the message has a certain status(Commit or Rollback). If a transactional message does not have a corresponding Op message, the status of the transaction is still undetermined (probably the second-phase failed). By introducing the Op message, the RocketMQ records an Op message for every Half message regardless it is Commit or Rollback. The only difference between Commit and Rollback is that when it comes to Commit, the index of the Half message is created before the Op message is written.
- How Op message stored and the correspondence between Op message and Half message
RocketMQ writes the Op message to a specific system topic(RMQ_SYS_TRANS_OP_HALF_TOPIC) which will be created via the method - TransactionalMessageUtil.buildOpTopic(); this topic is an internal Topic (like the topic of RMQ_SYS_TRANS_HALF_TOPIC) and will not be consumed by the user. The content of the Op message is the physical offset of the corresponding Half message. Through the Op message we can index to the Half message for subsequent check-back operation.
- Index construction of Half messages
When performing Commit operation of the second phase, the index of the Half message needs to be built. Since the Half message is written to a special topic(RMQ_SYS_TRANS_HALF_TOPIC) in the first phase of 2PC, so it needs to be read out from the special topic when building index, and replace the topic and queueId with the real target topic and queueId, and then write through a normal message that is visible to the user. Therefore, in conclusion, the second phase recovers a complete normal message using the content of the Half message stored in the first phase, and then goes through the message-writing process.
- How to handle the message failed in the second phase?
If commit/rollback phase fails, for example, a network problem causes the Commit to fail when you do Commit. Then certain strategy is required to make sure the message finally commit. RocketMQ uses a compensation mechanism called "back-check". The broker initiates a back-check request for the message in pending status, and sends the request to the corresponding producer side (the same producer group as the producer group who sent the Half message). The producer checks the status of local transaction and redo Commit or Rollback. The broker performs the back-check by comparing the RMQ_SYS_TRANS_HALF_TOPIC messages and the RMQ_SYS_TRANS_OP_HALF_TOPIC messages and advances the checkpoint(recording those transactional messages that the status are certain).
RocketMQ does not back-check the status of transactional messages endlessly. The default time is 15. If the transaction status is still unknown after 15 times, RocketMQ will roll back the message by default.
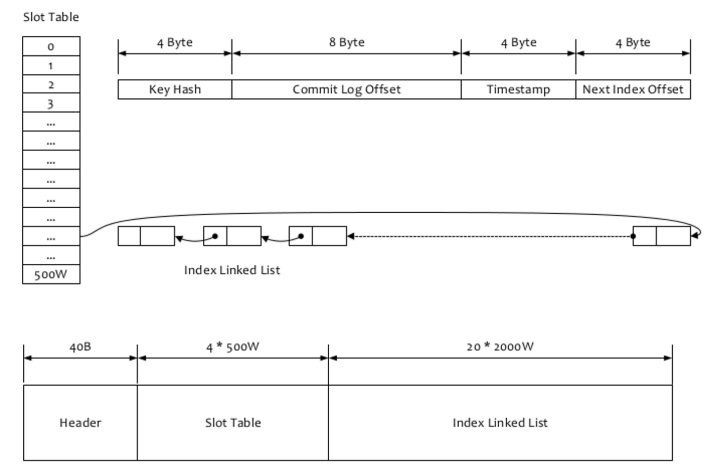
6 Message Query
6.1 Query messages by messageId
6.2 Query messages by message key
Best practices
1 Producer
2 Consumer
3 Broker
3.1 Broker Role
3.2 FlushDiskType
3.3 Broker Configuration
| Parameter name | Default | Description |
|---|---|---|
| listenPort | 10911 | listen port for client |
| namesrvAddr | null | name server address |
| brokerIP1 | InetAddress for network interface | Should be configured if having multiple addresses |
| brokerIP2 | InetAddress for network interface | If configured for the Master broker in the Master/Slave cluster, slave broker will connect to this port for data synchronization |
| brokerName | null | broker name |
| brokerClusterName | DefaultCluster | this broker belongs to which cluster |
| brokerId | 0 | broker id, 0 means master, positive integers mean slave |
| storePathCommitLog | $HOME/store/commitlog/ | file path for commit log |
| storePathConsumerQueue | $HOME/store/consumequeue/ | file path for consume queue |
| mappedFileSizeCommitLog | 1024 1024 1024(1G) | mapped file size for commit log |
| deleteWhen | 04 | When to delete the commitlog which is out of the reserve time |
| fileReserverdTime | 72 | The number of hours to keep a commitlog before deleting it |
| brokerRole | ASYNC_MASTER | SYNC_MASTER/ASYNC_MASTER/SLAVE |
| flushDiskType | ASYNC_FLUSH | {SYNC_FLUSH/ASYNC_FLUSH}. Broker of SYNC_FLUSH mode flushes each message onto disk before acknowledging producer. Broker of ASYNC_FLUSH mode, on the other hand, takes advantage of group-committing, achieving better performance. |
Access control list
Overview
This document focuses on how to quickly deploy and use a RocketMQ cluster that supports the privilege control feature.
1. Access control features
Access Control (ACL) mainly provides Topic resource level user access control for RocketMQ.If you want to enable RocketMQ permission control, you can inject the AccessKey and SecretKey signatures through the RPCHook on the Client side.And then, the corresponding permission control attributes (including Topic access rights, IP whitelist and AccessKey and SecretKey signature) are set in the configuration file of distribution/conf/plain_acl.yml.The Broker side will check the permissions owned by the AccessKey, and if the verification fails, an exception is thrown;
The source code about ACL on the Client side can be find in org.apache.rocketmq.example.simple.AclClient.java
2. Access control definition and attribute values
2.1 Access control definition
The definition of Topic resource access control for RocketMQ is mainly as shown in the following table.
| Permission | explanation |
|---|---|
| DENY | permission deny |
| ANY | PUB or SUB permission |
| PUB | Publishing permission |
| SUB | Subscription permission |
2.2 Main properties
| key | value | explanation |
|---|---|---|
| globalWhiteRemoteAddresses | string | Global IP whitelist,example: *; 192.168.*.*; 192.168.0.1 |
| accessKey | string | Access Key |
| secretKey | string | Secret Key |
| whiteRemoteAddress | string | User IP whitelist,example: *; 192.168.*.*; 192.168.0.1 |
| admin | true;false | Whether an administrator account |
| defaultTopicPerm | DENY;PUB;SUB;PUB|SUB | Default Topic permission |
| defaultGroupPerm | DENY;PUB;SUB;PUB|SUB | Default ConsumerGroup permission |
| topicPerms | topic=permission | Topic only permission |
| groupPerms | group=permission | ConsumerGroup only permission |
For details, please refer to the distribution/conf/plain_acl.yml configuration file.
3. Cluster deployment with permission control
After defining the permission attribute in the distribution/conf/plain_acl.yml configuration file as described above, open the aclEnable switch variable to enable the ACL feature of the RocketMQ cluster.The configuration file of the ACL feature enabled on the broker is as follows:
brokerClusterName=DefaultCluster
brokerName=broker-a
brokerId=0
deleteWhen=04
fileReservedTime=48
brokerRole=ASYNC_MASTER
flushDiskType=ASYNC_FLUSH
storePathRootDir=/data/rocketmq/rootdir-a-m
storePathCommitLog=/data/rocketmq/commitlog-a-m
autoCreateSubscriptionGroup=true
## if acl is open,the flag will be true
aclEnable=true
listenPort=10911
brokerIP1=XX.XX.XX.XX1
namesrvAddr=XX.XX.XX.XX:9876
4. Main process of access control
The main ACL process is divided into two parts, including privilege resolution and privilege check.
4.1 Privilege resolution
The Broker side parses the client's RequestCommand request and obtains the attribute field that needs to be authenticated.
main attributes:
(1) AccessKey:Similar to the user name, on behalf of the user entity, the permission data corresponds to it;
(2) Signature:The client obtains the string according to the signature of the SecretKey, and the server uses the SecretKey to perform signature verification.
4.2 Privilege check
The check logic of the right side of the broker is mainly divided into the following steps:
(1) Check if the global IP whitelist is hit; if yes, the check passes; otherwise, go to step (2);
(2) Check if the user IP whitelist is hit; if yes, the check passes; otherwise, go to step (3);
(3) Check the signature, if the verification fails, throw an exception; if the verification passes, go to step (4);
(4) Check the permissions required by the user request and the permissions owned by the user; if not, throw an exception;
The verification of the required permissions of the user requires attention to the following points:
(1) Special requests such as UPDATE_AND_CREATE_TOPIC can only be operated by the admin account;
(2) For a resource, if there is explicit configuration permission, the configured permission is used; if there is no explicit configuration permission, the default permission is adopted;
5. Hot loading modified Access control
The default implementation of RocketrMQ's permission control store is based on the yml configuration file. Users can dynamically modify the properties defined by the permission control without restarting the Broker service node.